
How to Update/Upgrade vCenter server patch versions


For upgrading from major versions (7.x) to major versions(8.x) we can download vCenter full image and use run installer and then upgrade option.

But in case of upgrade from same versions to next level patch :

1.Download the latest patch FP bundle(VMware-vCenter-Server-Appliance-7.0.3.01800-22837322-patch-FP.iso) from VMware website: Product Patches - VMware Customer Connect https://my.vmware.com/group/vmware/home


2.Once download ,copy the ISO to the esxi datastores.

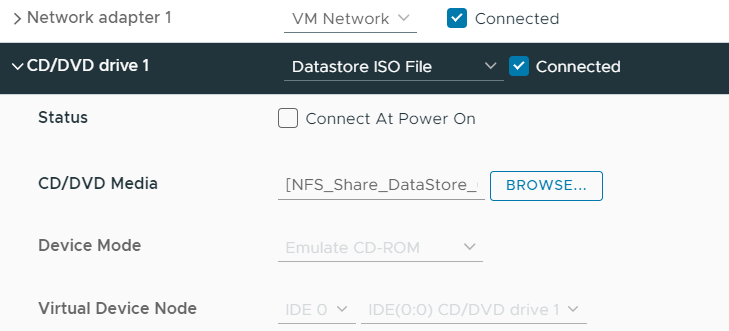
3.Go to the vCenter VM and edit attach this iso to CD/DVD and connect

4.Now login to vCenter using 5480 port with root.

5.Go to Updates and check for updates.


6.Now select Stage and Install.

7.You are done with install and reboot.


Or you can follow the below steps once you attach the DVD.

  1. Attach the VMware-vCenter-Server-Appliance-7.0.3.01600-21958406-patch-FP.iso file to the vCenter Server CD or DVD drive.

  2. Log in to the appliance shell as a user with super administrative privileges (for example, root) and run the following commands:

    • To stage the ISO:

      software-packages stage --iso

    • To see the staged content:

      software-packages list --staged

    • To install the staged rpms:

      software-packages install --staged


Comments

Popular posts from this blog

Deploy OVF fails Issues detected with selected template. Details: VALUE_ILLEGAL: No supported hardware versions among [virtualbox-2.2]; supported: [vmx-04, vmx-07, vmx-08, vmx-09, vmx-10, vmx-11, vmx-12, vmx-13, vmx-14, vmx-15, vmx-16, vmx-17, vmx-18, vmx-19].

 Error: While deploy using OVF file ,getting error as : Issues detected with selected template. Details: - -1:-1:VALUE_ILLEGAL: No supported hardware versions among [virtualbox-2.2]; supported: [vmx-04, vmx-07, vmx-08, vmx-09, vmx-10, vmx-11, vmx-12, vmx-13, vmx-14, vmx-15, vmx-16, vmx-17, vmx-18, vmx-19]. Solution: Open .OVF file and edit       <Info>Virtual hardware requirements for a virtual machine</Info>       <System>         <vssd:ElementName>Virtual Hardware Family</vssd:ElementName>         <vssd:InstanceID>0</vssd:InstanceID>         <vssd:VirtualSystemIdentifier>zabbix_appliance-6.2.7</vssd:VirtualSystemIdentifier>         <vssd:VirtualSystemType> virtualbox-2.2 </vssd:VirtualSystemType>       </System> to  vmx-19       <Info>Virtual hardware requireme...

Change ESXi acceptane level of VIBs to community Supported

-When you install VIB bundles you may see issue like:               'Could not find a trusted signer: self signed certificate  For resolving this issue, we have to convert the ESXi to community supported acceptance level. -To do that: if  ESXI is a VM :      Edit settings ->boot option ->disable secure boot. if Physical ESXi:      Edit  UEFI Now ssh to ESXi: - Move the ESX machine to community-support esxcli software acceptance set --level=CommunitySupported - Install the bundle with no-sign-check esxcli software vib install -d  VMware_bootbank_vmware-fdm_7.0.1-16478307.vib --no-sig-check -  Set back PartnerSupported esxcli software acceptance set --level=PartnerSupported